Tuesday, 26 February 2013

*REVIEW* Sleek Molten Metal 714

Hello :)
Today I have a new review for you...the Sleek Molten Metal Metallic Eyeshadow Duo in 714 which includes the colours Pewter and Goldleaf. There is also a duo in Steel & Ash which I'm keen to get my hands on! :)


The colour on the left is Pewter and the colour on the right is Goldleaf.
 
 
AVAILABILITY & PRICE:
The Molten Metal Eyeshadow Duos are both £7 from Superdrug or the Sleek website. I do wish Sleek makeup was easier to get a hold of but I can't complain too much as you can find it in most larger Superdrugs. :)

PIGMENTATION:
Apologies for the slightly dodgy swatch...I took a decent photo of a swatch at first but then somehow managed to loose it on my laptop :P

These are riculously pigmented...Cream shadows gererally tend to be pretty pigmented, but these really are beautiful. The only thing with this duo is that I wish the colours were slightyl different, as you can hopefully tell from the swatch there isn't a lot of difference in the two shades. It would be much better I think to have one of the colours a lot darker so you could create a more defined look with these two shades, because there isn't a lot of difference.
In saynig that, the shades are both beautiful (if not unique) and I love using either of the shades near my inner corner for a really bright look.

TEXTURE:
These are VERY creamy and easy to blend. I don't have any problems with the texture other than the fact that the creaminess means that they shadows dont really set ever.

WEARABILITY:
These do eventually crease after a few hours if left on the lids, althought eh colour does last quite well on the lids. The creasing can quickly be sorted out by just blending it slightly with a finger so this isn't a problem. As mentioned before..these don't really ever seem to set, but for cream eyeshadows that don't set they do last very well! :)

OVERALL:
I generally do love this eyeshadow duo and it gets used quite a lot. As I mentioned earlier, I definitely plan on buying the other colour because I love those charcoal shades and I think Sleek should bring out more shades of this! It makes doing an eyeshadow look so easy when you're in a rush and I love how bright the shades make my eyes look.


Would I buy again?
Definitely. :)

Thank you for reading! Hope you enjoyed my review!
Libby x

Friday, 22 February 2013

NOTD: Purple & Charcoal (22/02/2013)

Hello :)
I have a nail of the day to show you....
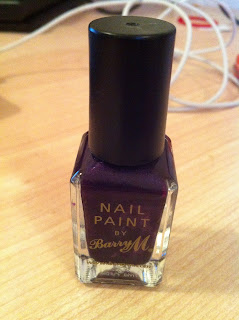
I recently discovered the Barry M nail polish in 161 Vivid Purple buried in amongst my nail collection...it had been forgotten about for a while now!
I paired it with the Collection 2000 Hot Looks Fast Dry nail polish in 50 All That Jazz - a really pretty gunmetal colour!
I often put two nail polishes together and have one colour on my accent nail as it allows me to wear different nail polishes at once :)

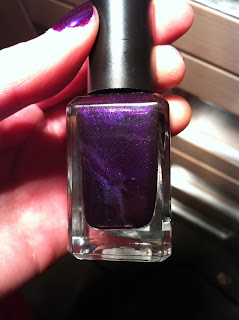
Barry M 161 Vivid Purple
I just had to get a good shot of the amazing shimmer in this!
Collection 200 Hot Looks Fast Dry 50 All That Jazz
 
Hope you enjoyed my NOTD :) What are you favourite nail polishes at the moment? Let me know in the comments below :)
 
Thanks for reading!
Libby x

My Top 3 Eye Brushes! :)

Hello :)

Today I decided to do a post based on my favourite brushes...today I'm doing eye brushes, but at some point I'll do face brushes too! :)

I'll go through them in for you! These aren't in any order :)

1) Urban Decay Good Karma Shadow Brush

This is the most expensive of all my brushes....at $26 and £14.50 in the UK....luckily I got mine the the Naked palette! :) I think these are still sold with the Naked palette now as well.
Basically this is a very firm, stiff brush which is SO good for packing on colour. Because it's stiff, you have very precise control over where your eyeshadow goes, and and the brush just keeps its shape so well!
I love the way it feels so good quality and its totally vegan! The handle is metal and looks really pretty too!
While this is a VERY expensive brush...I'm so glad I got it in the Naked palette so I didn't have to try and justify it to myself buying it for that price! This is the most expensive brush I have in my collection (I don't have any MAC brushes) but I really love it!
I also love that the bristles stay the same colour even after using some bright colours so it hasn't stained yet :)


2) Cosmopolitan Smokey Eyes Base Brush

I bought this a while ago in a Smokey Eyes Brush Kit, and I seem to remember it was around £7. The set included a smudge brush (which I never really use as it tugs on my lids a bit too much), an angled liner brush (which is really precise and I use a lot) and this brush.
Compared to the Urban Decay brush this has much softer bristles, and I trust it a lot more near my tear duct! It's nice and soft but is somehow still great for getting colour on the lids.
I love this mainly for its multifunctional nature! I can use is as a base brush for packing on colour, a blending brush, or even if I turn it on it's side it works great in the crease of the eye. It gets colour in the crease and is really precise, but then you can use it for blending into the crease as well...
This brush is always sitting in my "to-wash" brush pile because I use it so much, and being a lot cheaper than the UD brush I feel I could justify buying a backup.... :P
 
3) Fraulein 38 Pencil Brush

I bought this as part of a 32 piece brush set from Fraulein a while back...I believe it was around the £20 mark and from somewhere like Amazon...
The brush set has loads of brushes that I use on a daily basis, but this is definitely one of the ones I love the most!
Like the cosmopolitan brush this is very soft, and so I don't feel worried about using it near my eye. I have a bit of a fixation with these type of pencil/crease brushes...This one is perfect for either laying colour into the crease, or just blending out the crease. I love the way it makes it so effortless to create a blended out crease with this brush, and I can use it buff out the shadow, creating a really pretty smokey effect. This doesn't stay clean for long after I wash it because I'm always so keen to use it!

There you go, there are my favourite eye brushes! I will soon do my favourite face brushes too :)
What are yours?  Let me know in the comments below :)


Thanks for reading!
Libby x

Wednesday, 20 February 2013

Benefit Erase Paste vs Boi-ing concealer!

Hello :)
Today I wanted to do a post based on one of the questions that I spent a lot of time researching before buying a Benefit concealer. I'm always on the hunt for new concealers that I love and a while back now I was looking at trying out a Benefit concealer, but I didn't know which one!

By a happy coincidence I now happen to own both the Boi-ing concealer and the Erase Paste, so I feel I can now give them a proper run down of which I prefer!

Here they are side by side...I got the Boi-ing in full size for around £16 and the Erase Paste is a smaller version from the "Finding Mr Bright" kit from Benefit.
 
 
Erase Paste:


Pros:
  • Good pigmentation. The coverage is probably medium for this, but the coverage is pretty good as long as you layer it. (Swatches below)
  • An orange/salmon colour helps to hide blueness under the eyes which makes it got for eye bags
  • Quite creamy in texture and also thick, but does blend quite well.
  • Lasts quite well on the eyes.
  • The packaging..as with other Benefit products is pretty, but I don't know if you can count that as a pro...I wouldn't buy a product just based on it's packaging! :P
  • Has 4.4g which is more than Boi-ing.
Cons:
  • For  a full size this costs £19.50 for a full sized version...Very expensive for a concealer.
  • Only comes in 3 colours...this one is in medium and is too dark for me. All colours have a salmon undertone to them which could mean colour matching is quite difficult.
  • Creases quite badly under the eyes after a while...more than the average concealer.
  • You generally have to dip your finger into the pot to get it out, which isn't too hygienic..I don't find this a major problem as it is typical with potted concealers.
Boi-ing:

Pros:
  • This has 5 colour choices which makes it easier to find a colour match. It has Light, Light/Medium, Medium, Medium/dark, Dark. This also doesn't have the salmon tone that Erase Paste has which also might help with colour matching.
  • Slightly cheaper than Erase Paste, this is only £16.50 as opposed to £19.50.
  • Has 3g which is more than some concealers I've tried...yet it is still less than Erase Paste (but bear in mind it is cheaper)
Cons:
  • Packaging feels quite cheap/plastic-y. The packaging isn't very sturdy at all.
  • Again, like Erase Paste you have to dip your finger in which might be a problem for some people.
  • I don't like the texture of this...to me it feels like a lip balm. It feels very greasy and even feels like that when it's on your skin.
  • Coverage isn't good. This is expensive, but still has probably less coverage than some concealers I've tried that only cost a couple of pounds.
  • Texture is hard to work with, it feels slimy and is hard to blend because when you blend it, you end up just moving the product around.
  • Creases like crazy. More than Erase Paste. It creases badly no matter what powder or primer I use with it, by the end of the day it looks like a cakey mess.
I genuinely think the only reason I've managed to hit pan on the Boi-ing Concealer is that I have literally been trying it so many times to get it to work for me.
 
Above: Boi-ing
Below: Erase Paste
 
 
Overall:
Generally, I prefer Erase Paste to Boi-ing, but if I'm being completely honest I'm not that fond of either of them. I don't use either that much anymore as I've found better alternatives like the MAC Select Cover which is cheaper and covers better. My main problem with both is that they both crease quite badly because they are so creamy in texture. I can live with that with Erase Paste, as at least it does actually cover! Boi-ing has a horrible texture to me because it's so greasy, and it doesn't even cover well. Both of them are expensive, and like I mentioned I'm not too fond of either, but occasionally I do use Erase Paste. I don't use Boi-ing anymore, apart from when I want something to mute out the natural colour of my lips before applying lipstick. It does feel like a lip balm! Only not moisturising...
 :/

So overall I prefer Erase Paste and do use it occasionally. I would consider buying Erase Paste again if I find a colour that works better for me, as if the colour was better I could live with the creasing.
I won't buy boi-ing again, but I will carry on using it to mute out the colour of my lips occasionally.


Thank you for reading, I hope this was useful to you!
Libby x

Tuesday, 19 February 2013

My top 3 High Coverage Concealers!

Good evening :)
I decided to do a blog post based on something that I have always found difficult - finding concealers that actually have HIGH coverage!
I've compiled a list of 3 concealers in my collection that I feel have the best coverage.
Having inherited bad undereye circles and having acne scars I LOVE how much of a difference concealer makes.
These concealers aren't in any order but are just the ones that I feel have good coverage and can be used for different things.
 
1) Hard Candy Glamoflage Heavy Duty Concealer


This is probably the hardest to find if you're in the UK...I found mine online and paid around £6 for it, and I'm glad I did now!
The formula is VERY thick but still creamy. I use this for undereye circles and it really helps. One thing I'm not too keen on is that there are only 3 colours, and the shade I have ("Light") is a bit too pale for me, meaning in the summer I have to balance that out with something slightly darker.
The coverage is amazng though, and you can use this to cover up tattoos if you add plently to layers and then add powder. Obviously you can't pile on the layers that much if you're using it for your undereye area as it will cake up a lot but it still covers well with one layer.
With one layer this doesn't cake/crease too badly,  but creasing is inevitable with your undereye area.
I haven't used this to cover up spots as it's too light, but I imagine you could use it for that as long as you blend it well as it's very thick!


2)  MAC Studio Finish SPF 35 Concealer in NW20
 
 
The previous concealer was one that I use daily for undereye circles, and this is one that I use daily to cover up any blemishes! This is a very high coverage concealer and you can also build this up. I feel it's best to use your finger with this to warm it up and that helps it blend into the skin, but you can use a brush. I use this for blemishes mainly but as I also have a lot of darness in the very inner corner of my eyes near the bridge of my nose, I also use this on a small brush to brighten up my inner corner. This will definitely cake if you use it for your undereyes, but it still works well for blemishes. I feel so much better getting up in the morning knowing I can cover up any blemishes I have! This was around £14 for me off the Debenhams website and is $18 in the US. Quite expensive but you get 7g.
 
3)  MAC Select Cover Up Concealer in NW20
 
 I bought this for £14 off the Debenhams website after speaking to a MAC makeup artist who recommended it for my undereye circles The formula is pretty thin and it is expensive as it comes in a tiny tube, but I have had it and used it for a while and I haven't run out yet. The coverage is the best for a liquid concealer, I just wish there was more in the tube!I use this with a sponge to cover up dark circles and it is slightly dark for my skintone but only by a tiny bit, so I often apply a highlighting concealer over the top. The thin formula means that it doesn't cake up badly under my eyes and it gives great coverage.

So thats it for my favourite high coverage concealers, I'm already looking for new ones as I adore concealers! Sorry for having 2 MAC concealers as they are expensive, but they are worth it, and I have tried SO MANY concealers!

Thanks for reading!
Libby x

*REVIEW* - Too Faced Natural At Night Palette

Hello again :)
Today I've decided to review a palette that I've had a really good chance to experiment with over a few weeks...the Natural At Night palette from Too Faced.
There are a load of other palettes from Too Faced with other themes (Natural, Romantic, Matte, Naked to name a few) but this is the only one I have.
 
 
In this palette you get 9 eyeshadows: 3 large eyeshadows (2g each) and then 6 smaller ones (0.9g each)
On the back of the palette there is information about the palette but not the ingredients.
 
AVAILABILITY & PRICE:
You can find this in Boots or online at www.toofaced.com
I imagine in the US you can get Too Faced products at places like sephora :)
It is listed on the website as being $36 in the US and £28 in the UK. This does seem like quite a lot but there are quite a few eyeshadows in the palette there are some larger shadows too.
 
PACKAGING:
 
The packaging for this palette feels pretty sturdy and is made of that strong cardboard, even so I wouldn't risk getting it wet or bashing it about too much in case the eyeshadows break. I would trust this for travel though as it is quite strong.
 
A nice touch that comes with this palette are 3 instruction cards corresponding to the "sets" of eyeshadows, Night, Classic and Fashion. These could be quite useful if you didn't know which eyeshadows to pair together but I tend not to use them too much. I also like that there is no space wasted in this palette with a tiny brush, but there is no mirror.
 
COLOURS:
 
From top to bottom: Full Moon, Nightcap, Cocoa Star, Night Light, After Hours, Eclipse, Spotlight, Moon Stone, Night Fever.
 
From top: Full Moon, Nightcap, Cocoa Star, Night Light.


Full Moon:
A shimmery gold colour with some glitter, this can be quite easily compared to Urban Decay's Half Baked from the Naked palette. The texture does have some fallout but is generally very pigmented.
Nightcap:
Mid-light brown with some sparkle, but not nearly as much shimmer as Full Moon. Soft texture and blends out well.
Cocoa Star:
 Deep, matte brown. Very good texture for a matte, creamy and easily blended. One of my favourite colours, works great in the crease.
Night Light:
 Definitely my least favourite colour in the palette. Champagne colour with FAR TOO MUCH glitter. Very chunky and has a lot of fallout. The swatch above is even after I've done my best to get rid of the glitter. Very hard to use as it falls off easily. Colour comparable to Urban Decay's Sin but has chunky glitter similer to UD's Uzi.
From top: After Hours, Eclipse, Spotlight, Moon Stone, Night Fever.
 
After Hours:
One of my most used colours from this palette. Light taupe/brown with a lot of sparkle, but not nearly as much fallout as Night Light. Could be comparable to UD's Sidecar.
Eclipse:
Plum colour with shimmer but no sparkle. Good pigmentation and blends well, similar to UD's Last Call but with more brown tones.
Spotlight:
 Matte cream colour, again like Cocoa Star very creamy for a matte shade. Unfortunately this isn't light enough to be a highlight for me (I have fair skin) so you may need to combine this palette with another shadow to get a highlight. Works well in crease.
Moon Stone:
Yellow/brown with shimmer. Good pigmentation and interesting colour that makes the palette slightly more unique.
Night Fever:
Dark brown base with green tones and gold sparkles. One of the most unique colours in the palette. Works well in the crease but does have a lot of fallout, though it isn't as chunky glitter as Night Light.
 
 
Overall:
Generally I like this palette and have probably used it around 10 times since I got it (around Christmas) and I like the shadows. There are a few interesting colours in this palette and I like all of them (except for Night Light, far too chunky to be of any use, bit of a waste of one of the bigger eyeshadow pans) and you can create a lot of combinations with this palette. You can create quite a natural look with some of the lighter shades but also build it up to a more intense, dramatic look.
I do wish one of the other shades was in a bigger pan rather than nightlight, as this does seem a waste. Also something I've noticed is that all the shades kick up a bit of shadow, and could cause fallout, so I'd recommend holding a tissue underneath your eye to catch fallout.
The only other issue I have is that there isn't a highlight colour for me, as Spotlight is too much of a cream shade and isn't light enough to be a highlight.
Despite that, there are some really nice shades in here, (my favourites are Cocoa Star, After Hours and Eclipse) and is very useful for everyday looks that you can make more dramatic.
 
Would I buy again? Yes, I will probably end up buying more of these sets, maybe with my Boots advantage card points when I get enough! :)
 
Thanks for reading, I hope this review was useful to you!
Libby x


Monday, 18 February 2013

*REVIEW* - E.L.F All Over Colour Stick in Lilac Petal

Hello again ;)

I have another review for you...I'm on a roll...two reviews in one night :)
This review is for the E.L.F All Over Colour (or color for our American friends :) ) Stick, and the shade that I have is Lilac Petal.

E.L.F says: "3 in 1 colour for your eyes, lips, and or face! Get the colour that illuminates for a healthy glow, and instantly soothes and conditions the skin for fresh and natural colour all day long."
 
Oops. That didn't go quite as planned...
 
Take two :) That's slightly better....
 

PRICE & AVAILABILITY: You can get these pretty easily at www.eyeslipsface.co.uk
and they only retail for £1.50! :) There are 6 colours at the moment. I got mine through a mystery bag that was in aid of a charity for ovarian cancer, and I'm glad I recieved this because honestly I think left to my own devices it wouldn't be something I would pick out! For me orders from E.L.F generally come in about 3-5 working days.
 
PIGMENTATION: This has pretty good colour payoff. The shade is a pretty, shimmery, dusky lilac, and something I've found and loved about this is the way the shimmer adds a highlight to your cheekbones.
 
TEXTURE: The texture of this is fairly creamy, but boderlining on greasy for me. I have dry skin, so this doesn't affect me too much, but if you had oily skin you may find issues with it sliding off. It never sets fully, though it does seem to set a little bit after it's been on your cheeks a while. Luckily it does blend well though, giving a nice natural look. Personally, I find that the texture of this means I would only wear it on my cheeks. The website says that you can wear it on your eyes, lips or face, but for me it's too greasy for eyes (it would just crease or slide right off, though I guess you could use it as a base) and for my lips it just seems to settle into the cracks in my lips. As if I need reminding how dry my lips always are!
 
WEARABILITY: Due to the fact that this product never sets completely, it does wear off during the day. I find that after a few hours the general lilac colour has faded, but the shimmer remains for quite a while, which gives a nice highlight. For me it's not too much hassle to touch up once or twice throughout the day.
 
OVERALL: At first I wasn't too thrilled about this, and as I mentioned before, it wouldn't be something I would pick out myself, but now I am glad I do have it! It kind of sat around for a bit after I got it, but since my skin has been drier in the winter I have been reaching for it and it makes a really nice cream blush. Having quite fair skin this looks quite natural on me and I love the dewy look it gives as well as highlighting my cheekbones.
 
The packaging is pretty simple, and you have to wind up the product to get it out, but one small thing that niggles me is that the name has worn off already and like I've said I've only really used it a few times recently, so it's a bit annoying that the name has almost completely faded when I haven't used it a lot.
 
Would I buy it again?
Yes, although I can't see myself running out! I will almost certainly look at getting some more shades though in the future...I've discovered I'm much more of a cream blush person!
 
Thank you for reading! Hope you enjoyed my review :D
Libby x

*REVIEW* - NYX Jumbo Eye Pencil - Milk

First of all before I get started on this review....

**WELCOME TO MY BLOG!**

I started a makeup blog a while back but lost track of it....however I've decided to get back into blogging and this time stick to it!

I thought I'd kick off my blog posts with one of the products I've found myself reaching for so many times now...the NYX jumbo eye pencil. I have 3 colours and will get round to reviewing all of them serpately (as I feel differently about each of them) but will start with the shade Milk!  :)

The brand NYX is pretty hard to get here in the UK...:( but luckily I had a hunt on Ebay and managed to get 3 of them together in a bundle, I remeber paying around £4/5 for them, and after having a hunt online I've found that to be a pretty average price for them.
 
Those of you who have these or have seen them will notice that mine is pretty short...quite a good indication of how much I use it!
Here is a swatch of it applied heavily, then blended out a bit.
 
 
PRICE & AVAILABILITY: As I mentioned earlier, NYX is pretty hard to find in actual shops in the UK, but a quick hunt on Amazon or Ebay means that you can quite easily find NYX, also I've often found little bits in some TK maxx stores occasionally, it's a bit hit and miss and you mainly end up with the NYX palettes but you never know! Your best bet is the internet if you live in the UK. There's not much to complain about in regards to the price to be honest...prices vary slightly but I don't think I've ever seen it go for more than about £5. On the NYX website they retail for $4.50.
 
PIGMENTATION: The pigmentation of this pencil is pretty good, and the colour is quite opaque :) Obvisously if you blend it the colour will appear slightly more sheer but the colour is also buildable.
 
TEXTURE: These pencils are VERY creamy, and so generally need either blending out quite a bit or setting with some powder, or else they would slide all over the place.
 
WEARABLITY: This would not last too well if left on it's own (but then I'd never use a white liner alone on my lids anyway... :/ ) but generally if set with something I'll get about 8 hours before I notice fading.
 
OVERALL: Generally, I use this as a base for highlight colours on my inner corner. I have unfortunate, inherited under eye bags, and along with this comes with a lot of darkness in the inner corner of my eye. Unfortunately a white eyeshadow often just does not highlight it well enough...this is where the pencil comes in! I LOVE using this liner right on the inner corner of my eye near the bridge of my nose and tearduct before putting on a highlight colour there, or just blending it with my finger and leaving it where it is. It makes the shadow I'm putting on top last longer and look far more opaque. This liner can also be used as a shadow base, although I have the NYX white eyeshadow base which is basically the samw thing, just in pot form! You do have to blend this out though if you are going to use it as a base, it will enhance your shadows but crease if you apply a really thick layer.
 
Generally, this has been an amaazing product for me in terms of highlighting, which is what I've discovered a lot of people use it for after reading other reviews. You can also blend it below your browbone, but I don't tend to do this as often as I prefer an under browbone highlight with a bit of shimmer! :)
 
Would I buy again?
Definitely! And that may end up happening as this pencil seems to be getting a lot shorter very quickly!
 
Thank you for reading! Hope you enjoyed my review and watch out for more :)
Libby x