Showing posts with label Makeup Looks. Show all posts

Thursday, 10 October 2013

Sleek Series: 5 Looks With The Sleek Acid Palette

Hi!
 
I was looking through my Sleek palettes the other day and decided that I needed to remember to get more use out of them!
I thought I'd do a little series of posts where I do 5 different looks with each of the palettes.
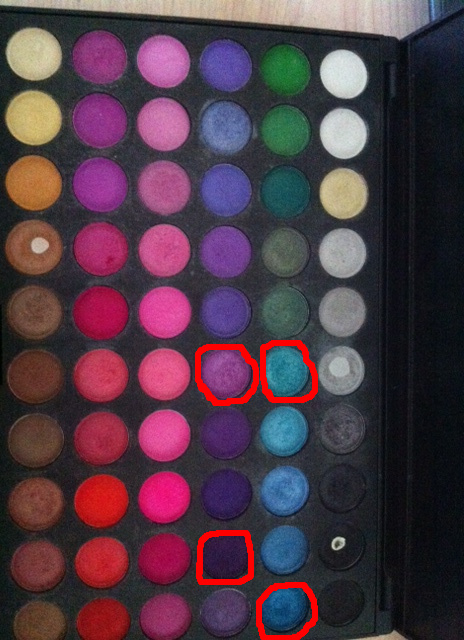
I shuffled them and the first one I picked up was coincidentally the newest addition to my Sleek eye shadow palettes, the Acid palette. This is such a fun palette to experiment with!


Here are the 3 looks!
 
 
Look 1:


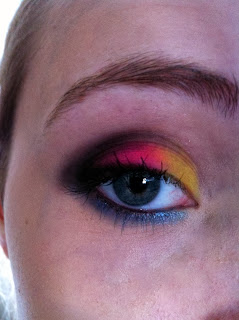
This is probably my favourite...I love the mix of bright colours and the black to add smokiness in the outer corner.
 
Colours used:
 
Matte Black (crease)
Neon Pink (Middle third)
Neon yellow (Inner third)
Shimmery Lighter Blue (inner half of bottom lashline)
Matte White (highlight)
Shimmer Darker Blue  (outer half of bottom Lashline)
 
I then finished with black eyeliner and mascara.
 
Look 2:


I decided to go for more blues/greens in this look.
 
Colours used:
 
Neon Green (inner third)
Shimmery Silver (outer third)
Shimmery dark blue (crease)
Matte White (highlight)
 
Again, black liner and mascara were then added!
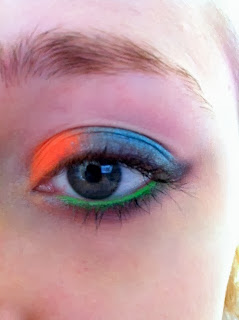
 
Look 3:


This was quite a bright look that isn't too wearble but fun to try out :)
 
Colours Used:
 
Neon Orange (Inner third)
Shimmery Blue (Crease)
Neon Green (waterline over NYX eyeshadow base)
Matte Black (lower lashline)
 
I then added mascara.
 
Look 4:


This look is very...pink. :)
 
Colours Used:
 
Neon Pink (inner half)
Deeper Pink (outer half)
Black (crease)
Matte White (highlight)
+ Black liner.
 
This is really bright which is so easy to do when you have a palette that is as bold and bright as this is! :)
 
Look 5:


 This look to me just screams "acid". This bright green actually looks really cool and I actually really like this look!
 
Colours Used:
 
Neon Green (Inner half)
Moss Green (Outer half)
Black (Crease)
Neon Yellow (Inner corner near tearduct)
White (highlight)
Neon Green (used over NYX eyeshadow base on the waterline)
Shimmery blue (smudged on bottom + top lashines)
 
Bonus:
 
I decided to include this as a "bonus" as its very close to the first look...however I substituted the black for the matte dark pink and discovered that you can actually make it look surprisingly different...this is pretty much the same as the first look but even brighter.


Colours used:
 
Matte Dark Pink (crease)
Neon Pink (middle third)
Neon Orange (blending middle third and inner third)
Neon Yellow (Inner third)
Shimmery Light Blue (bottom lashline)
Matte Black (Top lashline)
 
 
So there you go!
These types of posts do take a little while to put together but they're very fun to do and it means that I can get the most out of the shadows that I have..
Eventaully I will get one of these posts done for each of the 6 palettes that I have from Sleek so keep a look out if you're interested! :)
 
Thanks so much for reading!
Libby x
 

Sunday, 22 September 2013

Makeup Look: Galaxy Glam

Hi!
 
I have a quick makeup look for you today, using the new CID cream shadows that I got the other day.
 
I also used a shadow from Too Faced that I've always thought looks so nice in the pan but doesn't show up so well on the eyes. However with the new CID cream shadow as a base, it just really popped!


Products used:
 
New CID I-colour Cream Shadow in Zinc (outer half of the lid)
New CID I-colour Cream Shadow in Twilight (Inner half)
Too Faced Galaxy Glam Eyeshadow in Deep Space (patted over Zinc)
Urban Decay 24/7 Glide On Eye Pencil in Electric (bottom lashline)
Bourjois 1001 Cils Mascara
Bourjois Brush Concealer (under eyes)


Here's the Too Faced eyeshadow...isn't it pretty??
I've always felt slightly disappointed that it didn't look this pretty on the lids before now but I've found that it just works SO well over the CID Cream Shadow..it pops about 100x more!
 
I also thought the other creams shadow in Twilight looked pretty on the inner half and I wanted a nice pop of bright blue below the lashline :)
 
Thanks so much for reading!
Libby x

Saturday, 14 September 2013

Makeup Look: Smokey Red & Black

Hi!
 
Today's post is just a quick makeup look that I was trying out the other day...I've been really into wearing red and black recently together...I even bought some red and black shoes the other day! :)


Products used:
NYX Eyeshadow Base in White
Barry M Dazzle Dust in Cherry Red 84
Barry M Dazzle Dust in Gold 96
The Natural Collection Eyeshadow in Sea Shell
Coastal Scents 88 Original Palette (Black + matte taupe shades to blend)
Stila Fibre Optics Mascara
Borjois Khol & Contour Eyeliner
 
I patted the matte black shade over the NYX shadow base and then blended in the inner corners with a matte skin tone/taupe shade from the Coastal Scents palette. I then blended out the crease with the red Dazzle Dust and buffed the Natural Collection eye shadow below the brow bone to blend it out.
I then just added a small amount of the gold on the inner corner on the bottom lashine.
I then just added eyeliner and mascara!
 
The effect is very smokey but striking with the pops of red and gold!
 
Thanks so much for reading!
Libby x
 

Wednesday, 21 August 2013

Makeup Look: Peacock Eyes! (+ Coloured Nails)

Hi!
 
I haven't posted a makeup look here in a while and the other day I was playing around with makeup and came up with a peacock inspired eye look!
 
My nails also needed doing so I painted them in peacock-inspired colours :)


Under my left I did a little bit of an extra design to make it more interesting!
 
 
Products used:
 
NYX Eyeshadow base in White
(all over lid and also in waterline o give the shadow something to stick to)
MUA Liquid Liners in Shade 2 + 3
(electric blue and bronze colour used to do the peacock design underneath)
The Natural Collection Eyeshadow in Seashell
 (used as highlight)
120 Pro Palettte
 (shades circled below!)
Stila Fibre Optics Mascara


Hopefully you can pick out which colours are used where! This look took quite a lot of time to do because it was more complex than your average look but it was so fun to do!
 
 
I also decided to use the same sort of colours on my nails too as they needed doing!
 
On my thumb is O.P.I 's Plugged In Plum
then on my fingers going left to right:
 
Collection 2000 Nail Polish in 225 (possibly discontinued now)
Collection 2000 Fast Dry in Show Off
Next Nail Polish 13
Next Nail Polish 16 (both of these came in a set)
 
 
So there you have it! I hope you enjoyed my peacock inspired eye look and colour inspired nails!
I think at some point I will do a more intricate peacock design on the nails but I'm not sure when I'll get round to doing that!
Thank you so much for reading
Libby x

Wednesday, 31 July 2013

Makeup Look: 80's Inspired Eyes!

Hi!

I have another makeup look today, one that I was inspired to do from photos of makeup from the 80's!
It was so fun to do this, I really love just being able to sit down and have a play with bright colours. It's not really a wearable look...but who only wants to ever do wearable looks?!
This was also an excuse for me to use my blue mascara that I got a while ago as a sample :)


Products used:
 
NYX Eyeshadow Base in White
MUA Liquid Liner Shade 5
No.7 Extreme Length Mascara in Iridescent Sapphire (yes, it's blue mascara! :D )
Urban Decay 24/7 Glide On Eye Pencil in Zero
Fraulein 38 120 Pro Palette


First I used the NYX base with a synthetic brush all over the lid to give the super bright shadows something to cling onto. I used the bright, fuscia pink from the 120 palette on the outer half and then blended the shimmery blue together on the inner half.
 I think blue and pink for me just scream 80's makeup and how often do you get to put those two together?? :)
I took the purple and blended it into the crease and slightly below the bottom lash line.
I used the slightly shimmery white as a highlight.
I lined the outer half of my top lash line with the MUA liquid liner as I noticed in a lot of photos the liner was quite harsh and I wanted to keep the liner as close to the lash line as possible so it didn't detract from the blue & pink on the lids.
I also lined my waterline with the UD liner.
And then I topped it off with the No.7 blue mascara!
 
While I didn't actually buy the mascara (I got it in a free sample) it was still fun to use because I've never really been able to use it for much because it's not the sort of thing you can throw on for school!
 
Plus a bonus picture of our 12 week old Collie cross puppy! :)
I think this photo just emphasizes his massive ears...he hasn't grown into them yet!
 
 
Anyway, this was a really fun look to do! Hope you enjoyed it!
Thanks for reading
Libby x
 

Sunday, 28 July 2013

5 Different Looks With The UD Naked Palette!

Hi!
 
When the Naked palette came out from Urban Decay, I told myself I wasn't going to buy it. I told myself it was too expensive just for eye shadows. I did manage to hold off buying it for a long time until I found myself reading reviews and seeing swatches and...well...I caved.
 
And I'm very glad I did!
 
Now I have my palette (along with a large percentage of the population) I decided that I had to promise to myself to get good use out of it, something that I feel I have achieved!
Although I am aware that it can be a little tricky working out really different looks that can be created using this, so I thought I'd compile a little list of 5 different looks to hopefully inspire some people!


Look how pretty! :)
 
Here's a really quick run down of the colours for reference:
 
Virgin: Soft, satin finished cream
Sin: Shimmery champagne
Naked: Matte light/mid brown
Sidecar: Cool toned light brown with shimmer & some small glitter
Buck: Matte mid brown
Half Baked: Shimmery, intense gold
Smog: Shimmery deep bronze
Darkhorse: Darker brown colour with some gold flecks
Toasted: Dusty pink/rose wit some shimmer
Hustle: Cool taupe colour with some shimmer & hints of purple
Creep: Black base colour with gold sparkle
Gunmetal: Blue toned deep silver
 
 
Just thought I'd quickly mention a couple of my favourite shades: Virgin is my favourite highlight colour ever and the only shade here I've hit pan on. Half Baked is simply beautiful. Smog works great with my blue eyes. Sin makes a pretty, simple light everyday look.
 
Ok, onto the looks!
 
 
Look 1: Soft & Smudged


For this look after putting on a primer and NYX Jumbo Eye Pencil in milk on my very inner corner (I have a lot of darkness & veins around my eyes) I used the colour Sin on the inner half of my lid and Toasted on the outer half.
I lined my top lash line with the Urban Decay 247 liner in Zero and topped that with the shadow Creep.
I took a pencil brush and blended this out until it looked really soft and smudged.
I blended Virgin under the brow bone and inner corner and finally as a finishing touch I added a tiny bit of the colour Half Baked on the lower lash line, just near the inner corner for just a pop of gold :)
 
Look 2: Sultry & Smoked


For this one I wanted to make the look a little more smokey!
I primed my lids and added the NYX Jumbo Eye Pencil in Milk again to the inner corner.
I then used Sidecar on the inner half of the lid and then Creep to the outer half of the lid and then blended it to make it smokier.
This time when I did this, I blended out the Creep shade quite a lot but you could easily pack more onto the lid for a really intense look to make it darker!
I also smudged a bit of Sin just on the inner half but on the lower lashline.
I blended Virgin as my highlight on the inner corner and below the brow bone.
Then I used the UD 24/7 liner in Zero on the bottom water line and added mascara!
 
Look 3: Beautiful & Bronzed


*Sigh*
It is SO hard to get these colours to show up as vibrant on camera as they are in real life.
This is one of my favourite looks to do with this palette...Definitely one of my go-to looks!
I really love doing bronze/gold smokey eyes!
I primed my lids...added NYX pencil...etc. See above for details ;)
I used the colour Sin just on the very inner third but then used Half Baked for most of the middle third of the lid, blending into the Sin shade.
I then packed the colour Smog on the outer half of the lid....I think this colour works really well with the blue in my eyes!
I then added a small amount of Darkhorse to the crease and blended this out.
I once again used Virgin as a highlight.
I lined my bottom lash line with the 24/7 liner in Zero and then also decided to add some winged liner for something a little different. I used the Soap & Glory Super Cat liquid liner and then finished with mascara!
 
 
Look 4: Dark & Dramatic


For this look I wanted to create something quite dramatic!
After priming etc I first applied Gunmetal all over the lid and then used the 24/7 liner in zero to create the shape around the outer v, sort of like a cat eye shape. I then filled this in with the liner and then topped it with the Creep shadow.
I blended out the crease a lot to make it smoked and then used the colour Sin on the very inner corner and on the inner corner of the lower lash line.
I lined my waterline with the 24/7 liner and used Virgin as a highlight.
And then I finished with mascara!
I think it's really useful how even though most of the colours in the palette are neutral you can still create something really dramatic and smokey!
 
Look 5: Simple & Safe


I decided to include this look because it just emphasises what this palette is great at, just producing really simple and safe looks that still look pretty.
For this look after priming I used Sin all over the lid, but in all honesty you could use most of the shades in the palette all over the lid. Some of my favourites for a one shadow look are Sin, Sidecar, Virgin, Toasted and Hustle.
I then just used Virgin as a highlight and added mascara!
I think this palette makes doing these looks so easy and this look is great for when you only have about 5 minutes to do your makeup! :)
 
 
Wow. That's a long post!
I realise that there are 2 shades that I neglect in this palette, Naked and Buck. I think this is just because they are not shades that I would normally use. They are matte for a start (I'm such a sucker for shimmery shadows) and also being very fair skinned they are too dark for me to use as a blending colour. Because of this, they don't get used a lot and so weren't really used much in my looks here either. However every single other shade of this palette I DO get good use out of! :)


I hope some people found this useful, it definitely took a while together but I do think that this is a versatile palette and because I've gotten so much use out of it I think it's worth the price.
I think generally it's one of those palettes that I reach for when I'm being lazy because you can just pick out a random combination of shadows and it will pretty much always turn into a pretty look.
One that I just remembered that I love doing is having Smog all over the lid and Creep in the crease, these two blend so beautifully together!
 
So even though the shadows are all neutral (ish) you can still create quite a lot of different looks!
 
Thanks for reading!
Libby x