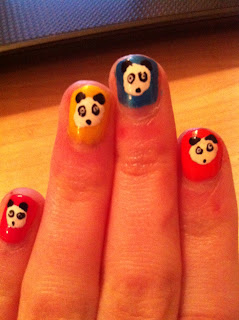
Today I have a nail look that is a little more intricate!
I was thinking about what to paint on my nails earlier today and remembered a panda design I did a while back...however this time I decided to make it a bit more colourful!
I thought I'd do a blog post on how to get this look, in case there are any other panda lovers out there! ;)
I used quite a lot of different products for this look, but you could easily switch it up to make the colours the way you want or to use the products you have :)
Step 1) BASE COAT! I'm using a lot of colourful polishes as the base for this look so it's always a good idea to use a base coat to stop the colours staining your nails...I've had a greenish tinge to mine before now where I forgot to use a base coat and it took ages to grow out. I'm just using a base coat I think from the Colour Workshop Nail Parade kit which had loads of different polishes in it.
Step 2) Paint your nails in whichever colours you want to be the background colours; I wanted bright colours and so I chose these:
I used these 5 colours to paint my nails, from left to right they are: Collection 2000 Hot Looks Fast Dry in Go Retro!, then Bright Lights, then Show Off, then the yellow is a Ruby & Millie nail polish in Yellow, then another Collection 2000 Hot Looks in Siren.
I used about 2 coats for each one to make sure it was opaque and bold.
Step 3) Draw the basis for the panda's face; a large white spot.
You can use any plain white nail polish but since they aren't too easy to find I used a Claire's Accessories nail tip whitener instead to get a matte white polish.
Step 4) Use black and white nail art pens to draw on the details of the panda. I'm using the Models Own nail art pens in black and white. Alternatively if you don't have any pens and don't want to buy one, you could use a nail brush or a long, thin fairly stiff brush to dip into black and white polishes that you already have, though I've found this harder.
I just have to pause for a moment to show you the amazing packaging on these...
First you use the black to draw on little circles for the ears:
Then you draw on the black dots for the fur around the eyes:
Then a black dot for the nose:
Then a smaller white circle inside the black circles for the eyes (you have to be pretty precise here):
And then finally you have to do a *tiny* little dot inside those white dots for the pupils...
And that's the whole thing! It's very time consuming but it's not too difficult and I find it looks so cute when its done! :)
You can of course use whatever base colours you want, or just have a clear coat underneath if you want.
I really love the way this turned out, last time I simply did the pandas over a clear polish, but I love the colourful effect of the background colours and it looks so bright!
I hope you enjoyed my little tutorial, it was really fun to do and it's not too hard - I'm not the most skilled person at nail art! I find it difficult because my hands are small and so I don't have much nail space, but I can manage this ok :)
Thank you for reading! I'll hopefully do more nail art designs in the future!
Libby x


No comments:
Post a Comment