Hi!
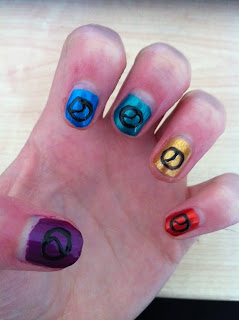
I tried out a nail design look a while ago where I painted yin & yang symbols on my nails and decided that because it was such a fun look it would be great to do a step by step post!
I made this look really bright and colourful and although it is fairly intricate, it isn't too hard to do.
I'm not the best at nail art but I do love doing nail art looks!
Someone with a steadier hand will probably be able to make a better job of this look but it's easy enough that it doesn't matter if you're not so great at doing designs on your nails.
I wanted really colourful backgrounds for my nails so I used these colours:
From left to right:
Collection 2000 Hot Looks Fast Dry polishes in
Scorched, Shimmy Shake, Bongo Beat, Show Off
Then the purple shade is from O.P.I called Plugged In Plum.
The reason I love the collection 2000 polishes is that I happen to have them in very bright colours and they're inexpensive!
For the actual symbols I'm also using the Models Own nail art pens in Black and White.
With these you can both squeeze out the colour or use the long thin brush to apply it, but I prefer to squeeze out the colour from the nib at the top.
Now lets get onto the design :)
Step 1:
Paint your nails in rainbow colours! I had to use about 2 coats for each nail.
I also think this looks better if you do it in the order of the rainbow, so starting from the pinky finger I used red, gold, green, blue and then purple :)
Then you just want the nails to completely dry so you don't smudge the coats underneath.
Step 2:
Using the black nail art pen, draw a black circle on each nail.
I find that you should probably always do the circles slightly bigger than you think because the line will be quite thick and you still need enough space inside to do the design.
Step 3:
Then draw a wavy black line inside the circle. This is fairly tricky but it's not essential to get the shape right. As you can see some of my lines are a bit dodgy but it doesn't detract from the overall look :)
Step 4:
Fill in one half of the circle. This can be quite fiddly but if you take your time you can fill it in as evenly as possible.
Step 5:
Now take the white nail art pen and fill in the other half of the circle. Make sure you let the black dry completely before or it will al smudge together and turn into a blurred grey circle...not exactly what we're looking for here!
Step 6:
Then do a white dot in the black half of the circle...
Step 7:
And finally add a black dot in the white section!
Again make sure the white is completely dry or it will all smudge together.
And that's it! :)

I find this looks quite striking and also even if you mess up a bit (like me) you can still get a great finished effect!
This is quite time consuming but it's not too tricky to do, just a little fiddly.
It is really important that you let the polish & pens dry completely before you move onto the next step or you could end up with a grey mixed up mess...it can be hard for someone as impatient as me but I think its worth it.
Did you like this yin & yang look?
Thanks so much for reading!
Libby x


No comments:
Post a Comment